How To Install Expansion Joints in Tile Flooring: A Step-by-Step Guide
Leave a message
Expansion Joint Placement in Tile Flooring
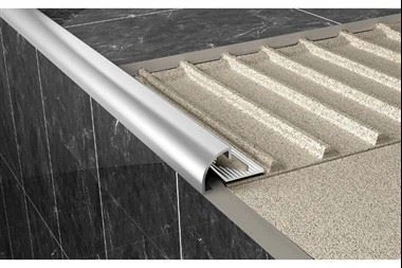
Expansion joints are intentional gaps or profiles inserted into tiled floors or walls to accommodate movement. They typically consist of a flexible insert within a metal or plastic frame, such as aluminum profiles, which absorb up to 20% of their width in movement.These joints are essential at junctions between different substrates, around perimeters, and in large areas to mitigate stress from heat, moisture, or structural shifts. Without them, your beautiful porcelain or ceramic tiles could crack over time, leading to costly repairs.
How to Install Expansion Joints?
1. Preparation
- Measurement and Layout: Determine the position, direction, and width of expansion joints based on design drawings or actual site conditions (usually spaced every 6–8 meters).
- Base Inspection: Check if the concrete or screed leveling layer is flat, firm, and free of cracks or hollow spots.
- Surface Cleaning: Remove debris, dust, and oil stains to ensure a clean substrate.
2. Expansion Joint Slotting
- Marking Lines: Use chalk lines to mark the centerline of the expansion joint.
- Cutting Slots: If the screed layer is completed, cut slots at the marked locations using a cutting machine. Slot width and depth depend on the expansion joint type (commonly 20–30 mm wide).
- Cleaning the Groove: Remove cutting debris and dust, keeping the groove clean.
3. Installing Expansion Joint System
- Place Joint Profiles: Position aluminum, stainless steel, or brass profiles along the centerline, ensuring alignment and straightness.
- Fixing Profiles: Secure profiles to the substrate using expansion bolts or adhesive, maintaining consistent gap width.
- Insert Backing Material: Fill the groove with foam rods or other flexible backing material to provide elasticity.
- Seal with Joint Sealant: Apply weather-resistant silicone or polyurethane sealant on top, smooth and compact it.
4. Tile Installation
- Tile Layout: Tiles must stop at expansion joints, never spanning across them.
- Align with Profiles: Tile edges should fit closely against the joint profiles, keeping the surface level.
- Grouting: Use standard grout for regular tile joints; for expansion joints, apply flexible sealant instead.
5. Finishing and Protection
- Inspection: Ensure the joint is straight, uniform in width, and visually neat.
- Protection: Cover or protect joints during subsequent construction to prevent damage or contamination.
✅ Key Points:
- Expansion joints must cut through the entire structure layer (tile + mortar bed + screed).
- Fill with flexible materials, and seal with weather- and aging-resistant sealants.
- Maintain clean, straight lines for both function and aesthetics.

Proper installation of expansion joints in tile prevents damage from thermal expansion, especially in areas with underfloor heating or external exposure. The British Standard BS5385 recommends placing joints every 6-8 meters in internal spaces and more frequently outdoors. For heated floors, divide areas into bays no larger than 40m². By incorporating these, you enhance the tile's lifespan, maintain aesthetic appeal, and comply with industry standards. Hero metal offer high-quality aluminum expansion profiles that are ISO9001 certified, ensuring trustworthiness and expertise in your project.
Materials and Tools Needed
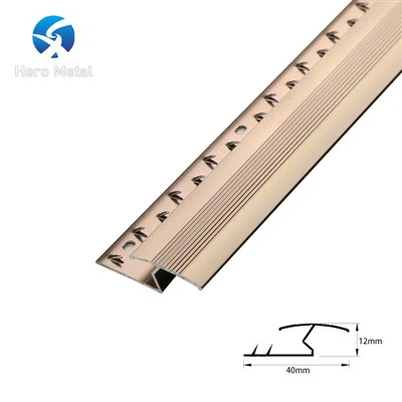
Before starting, gather the right materials. High-quality products from HERO METAL include aluminum tile trims, tile accesorries and movement joint profiles in various finishes like anonized with grey or beige inserts. Ensure the profile height matches your tile thickness perfectly (e.g., 12mm for 10mm tiles).
| Item | Description |
|---|---|
| Expansion Joint Profiles | Aluminum or chrome profiles with flexible inserts (available at TileTrim.com). |
| Tile Adhesive | Flexible adhesive suitable for your tile type. |
| Tiles | Porcelain, ceramic, or natural stone tiles. |
| Tools | Trowel, measuring tape, marker, spacers, and a level. |

Conclusion: Step-by-Step to Installing Expansion Joints in Tile Flooring
-
Plan and Mark Positions: Identify where joints are needed based on the guidelines-perimeters, large spans, or heated areas. Use a measuring tape and marker to outline positions accurately.
- Prepare the Surface: Ensure the substrate is clean, dry, and level. Apply a primer if necessary for better adhesion.
- Apply Adhesive: Spread tile adhesive along the marked line using a notched trowel.
- Insert the Joint Profile: Press the expansion joint profile firmly into the adhesive, ensuring it's level with the surrounding area.
- Install Surrounding Tiles: Apply adhesive around the joint and place tiles, leaving a 2mm grout gap. Use spacers for even spacing and check flushness with the profile's top edge.
- Grout and Finish: Once adhesive sets, grout the joints, avoiding the flexible insert. Clean excess and allow curing.

This process ensures seamless integration. For premium profiles, visit HERO METAL, where you'll find over 3000 decorative building materials backed by a 10-year warranty.
Tips and Best Practices for Tile Expansion Joints Installation
-
Always match profile size to tile thickness to avoid uneven surfaces.
- For external or heated tiles, reduce joint intervals to handle greater movement.
- Refer to BS5385 for detailed standards and consult professionals for complex layouts.
- Choose durable materials from trusted suppliers like HERO METAL to ensure long-term performance.
Common Mistakes to Avoid
One frequent error is skipping joints in large areas, leading to cracks. Another is using mismatched profiles, causing aesthetic or functional issues. Always double-check measurements and allow for proper curing time. By following this guide, you can sidestep these pitfalls and achieve professional results.
Mastering how to install expansion joints in tile is key to a resilient flooring system. By incorporating expert advice from sources and sourcing quality products from www.tiletrim.com, you'll ensure your project stands the test of time. If you're tackling a tile installation, start with the right tools and profiles today. For more tiling tips, explore our blog or contact us for personalized advice.