How to Install LED Aluminum Profiles in Walls: A Step-by-Step Installation Guide
Leave a message
Materials and Tools You'll Need
Gathering the right supplies upfront saves time and frustration. Here's a comprehensive list:
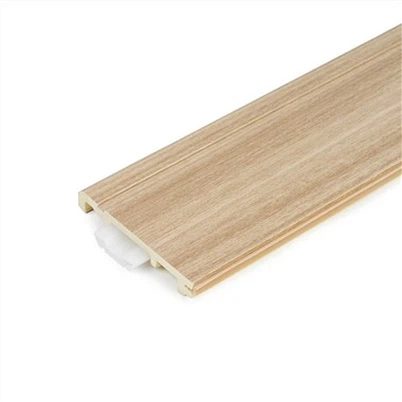
- LED Aluminum Profile: Choose one like the 6063-T5 alloy from HERO METAL for optimal heat management and strength.
- LED Strip Lights: Opt for DC24V strips with 8-14W/m power, in your preferred color temperature.
- Diffuser or Cover: Milky white or clear PC covers for even light spread.
- Power Supply and Connectors: Waterproof if needed, plus flexible connectors for corners.
- Mounting Accessories: Double-sided tape, mounting brackets, screws, and glue.
- Tools: Tape measure, pencil, drill, wallpaper cutter or saw, screwdriver, protractor, insulating tape, and a cleaning cloth with mild solution.
Don't skimp on quality-using certified materials ensures safety and longevity, avoiding issues like flickering or premature failure.
Step-by-Step Installation Guide
Installing an LED aluminum profile in the wall isn't as daunting as it seems, but precision is key. We'll cover both recessed and surface-mounted methods, blending tried-and-true techniques with practical enhancements.
Preparation Phase
Start by planning your layout. Measure the wall area where the profile will go, marking lines with a pencil for accuracy. Clean the surface thoroughly with a microfiber cloth and soapy water or alcohol wipes to remove dust, grease, or residue-this ensures strong adhesion and prevents future peeling. If integrating with wood panels, align profiles between slats for a hidden effect.
For recessed installs, check wall depth; you'll need at least 1-2 cm for embedding. Turn off power at the breaker to avoid electrical hazards.
Cutting and Assembly
Test your LED strips by plugging them in-look for even lighting without dim spots. Cut the aluminum profile to length using a wallpaper cutter or fine saw, guided by a protractor for straight edges. Remember, cut the LED strip at copper marked points only, and make it 2cm shorter than the profile to accommodate end caps.
Attach the LED strip inside the channel using double-sided tape. For corners, use flexible connectors to maintain continuity. Secure ends with insulating tape to prevent shorts.
Mounting the Profile
For recessed: Drill or cut a groove matching the profile's dimensions-aim for a snug fit. Apply mounting glue along the back, insert the profile, and use brackets for extra hold. Press firmly and let it set for 24 hours.
For surface-mounted: Fix brackets to the wall with screws, spacing them every 50cm. Snap the profile into place, ensuring it's level. This method is quicker and reversible.
Wiring and Testing
Connect the strip to the power supply, matching polarity (positive to positive). Hide wires behind baseboards or in conduits for a clean look. Install the diffuser by clipping it on-it softens light and protects the LEDs.
Power up and test: Check for flickering (often due to loose connections) or uneven brightness. If issues arise, double-check voltage compatibility and secure all joints.
Finishing Touches
Patch any wall imperfections with filler, paint if needed, and integrate dimmers or smart controls. For wood walls, seal edges to prevent moisture ingress, enhancing the profile's lifespan.
This process typically takes 2-4 hours for a standard wall section, but factor in drying time for adhesives.
Tips and Common Mistakes to Avoid
To get pro-level results, avoid bending strips sharply-use connectors instead to prevent wire damage. Always match power supplies to your setup's wattage to dodge overheating. A lesser-known tip: Incorporate RGB options for mood lighting, but test colors against wall tones first.
Common pitfalls include skipping surface prep, leading to poor adhesion, or overloading circuits-use a dedicated outlet. For sustainability, choose recyclable aluminum profiles to minimize environmental impact.
Maintenance and Troubleshooting
Keep your installation shining with simple upkeep: Dust diffusers monthly and inspect connections annually. If lights dim, replace the power supply; for moisture issues in damp areas, opt for IP67-rated profiles.
Troubleshoot flickering by reseating connectors or checking for voltage drops over long runs-add amplifiers if needed.
Mastering LED aluminum profile installation in walls opens up endless design possibilities, blending efficiency with style. With the right approach, you'll achieve a flawless, long-lasting setup that boosts your space's appeal.
As your go-to supplier, HERO METAL specializes in LED profiles

Over 10 years in the industry, we offer more than 3,000 products, including custom LED channels backed by ISO9001 certification and a 10-year warranty. Trusted in over 100 countries, our focus on innovation and reliability ensures top-notch solutions for your projects. Visit our LED profile page to explore options and get started today.